- 本文介绍如何对一个 Python 项目在本地打包,发布在 PyPI 上
- 大致流程:
- project => package => distribution package => archives => PyPI => pip
创建一个简单的 project
创建一个 project
- 创建 project 目录
$ mkdir packaging_tutorial
- 在 project 目录中创建用于存放 project 源代码的
src目录
$ cd packaging_tutorial
$ mkdir src
- 在
src目录中创建 Python 源代码包example_package目录
$ cd src
$ mkdir example_package
- 在
example_package目录中创建 Python 源代码模块文件__init__.py、example.py
$ cd example_package
$ touch __init__.py
$ touch example.py
- 在
example.py源代码模块中添加一个简单的函数
$ vim example.py
1 def add_one(number):
2    return number + 1


-- INSERT --
生成的 project 结构
packaging_tutorial/
└── src/
    └── example_package/
        ├── __init__.py
        └── example.py
创建 package 文件
最终生成的 project 结构如下:
packaging_tutorial/         # project
├── LICENSE                 # 许可证
├── pyproject.toml          # TODO
├── README.md               # 项目介绍
├── setup.cfg               # metadata
├── src/                    # 源代码
│   └── example_package/
│       ├── __init__.py
│       └── example.py
└── tests/                  # 单元测试
创建用于单元测试的 tests 目录
tests目录用于存放单元测试脚本,关于 Python 单元测试另外介绍
- 在
packaging_tutorial目录下创建tests目录
$ pwd
~/packaging_tutorial/src/example_package

$ cd ../..
$ mkdir tests
创建 pyproject.toml 文件
pyproject.toml用于…
- 在
packaging_tutorial目录下创建 ·pyproject.toml文件
$ pwd
~/packaging_tutorial

$ touch pyproject.toml
$ vim pyproject.toml

-- INSERT --
- 文件内容如下
[build-system]
requires = [
    "setuptools>=42",
    "wheel"
]
build-backend = "setuptools.build_meta"
配置 metadata
metadata 用于…
- 方法一:在
packaging_tutorial目录下创建静态 metadatasetup.cfg。本文以静态 metadata 举例
$ pwd
~/packaging_tutorial

$ touch setup.cfg
$ vim setup.cfg

-- INSERT --
- 文件内容如下
[metadata]
name = example-pkg-YOUR-USERNAME-HERE
version = 0.0.1
author = Example Author
author_email = author@example.com
description = A small example package
long_description = file: README.md
long_description_content_type = text/markdown
url = https://github.com/pypa/sampleproject
project_urls =
    Bug Tracker = https://github.com/pypa/sampleproject/issues
classifiers =
    Programming Language :: Python :: 3
    License :: OSI Approved :: MIT License
    Operating System :: OS Independent

[options]
package_dir =
    = src
packages = find:
python_requires = >=3.6

[options.packages.find]
where = src
- 方法二:在
packaging_tutorial目录下创建动态 metadatasetup.py
$ pwd
~/packaging_tutorial

$ touch setup.py
$ vim setup.py

-- INSERT --
- 文件内容如下
import setuptools

with open("README.md", "r", encoding="utf-8") as fh:
    long_description = fh.read()

setuptools.setup(
    name="example-pkg-YOUR-USERNAME-HERE",
    version="0.0.1",
    author="Example Author",
    author_email="author@example.com",
    description="A small example package",
    long_description=long_description,
    long_description_content_type="text/markdown",
    url="https://github.com/pypa/sampleproject",
    project_urls={
        "Bug Tracker": "https://github.com/pypa/sampleproject/issues",
    },
    classifiers=[
        "Programming Language :: Python :: 3",
        "License :: OSI Approved :: MIT License",
        "Operating System :: OS Independent",
    ],
    package_dir={"": "src"},
    packages=setuptools.find_packages(where="src"),
    python_requires=">=3.6",
)
创建 README.md 文件
- 每个 project 都应该有一个
README.md文件,README.md文件用于对整个项目进行一个简单的功能介绍。 包括 project 安装、功能、使用- 关于如何写一个好的
README.md介绍,可以参考这里
- 在
packaging_tutorial目录下创建README.md文件
$ pwd
~/packaging_tutorial

$ touch README.md
$ vim README.md

-- INSERT --
- 文件内容如下
# Example Package

This is a simple example package. You can use
[Github-flavored Markdown](https://guides.github.com/features/mastering-markdown/)
to write your content.
创建 LICENSE 文件
- 选择一个适合自己 project 的 license:https://choosealicense.com/
- 下面以 MIT license 举例子
- 在
packaging_tutorial目录下创建LICENSE文件
$ pwd
~/packaging_tutorial

$ touch LICENSE
$ vim LICENSE

-- INSERT --
- 文件内容如下
Copyright (c) 2018 The Python Packaging Authority

Permission is hereby granted, free of charge, to any person obtaining a copy
of this software and associated documentation files (the "Software"), to deal
in the Software without restriction, including without limitation the rights
to use, copy, modify, merge, publish, distribute, sublicense, and/or sell
copies of the Software, and to permit persons to whom the Software is
furnished to do so, subject to the following conditions:

The above copyright notice and this permission notice shall be included in all
copies or substantial portions of the Software.

THE SOFTWARE IS PROVIDED "AS IS", WITHOUT WARRANTY OF ANY KIND, EXPRESS OR
IMPLIED, INCLUDING BUT NOT LIMITED TO THE WARRANTIES OF MERCHANTABILITY,
FITNESS FOR A PARTICULAR PURPOSE AND NONINFRINGEMENT. IN NO EVENT SHALL THE
AUTHORS OR COPYRIGHT HOLDERS BE LIABLE FOR ANY CLAIM, DAMAGES OR OTHER
LIABILITY, WHETHER IN AN ACTION OF CONTRACT, TORT OR OTHERWISE, ARISING FROM,
OUT OF OR IN CONNECTION WITH THE SOFTWARE OR THE USE OR OTHER DEALINGS IN THE
SOFTWARE.
创建其他文件
- https://packaging.python.org/en/latest/guides/using-manifest-in/#using-manifest-in
- https://setuptools.pypa.io/en/latest/userguide/datafiles.html
生成分发档案
为 包(package) 生成 分发包(distribution packages)。这些 archives 被上传到 Python Package Index(PyPI) 上, 并且通过 pip 安装
- 生成分发档案
$ pwd
~/packaging_tutorial

$ python3 -m pip install --upgrade build

# 在 pyproject.toml 文件所在目录运行以下命令
$ python3 -m build                       # 静态构建
$ python3 -m setup.py sdist bdist_wheel  # 动态构建
-
以上命令生在
dist目录中生成两个文件tar.gz:source archive.whl:build distribution
packaging_tutorial/
    dist/
      example_pkg_YOUR_USERNAME_HERE-0.0.1-py3-none-any.whl
      example_pkg_YOUR_USERNAME_HERE-0.0.1.tar.gz
    ...
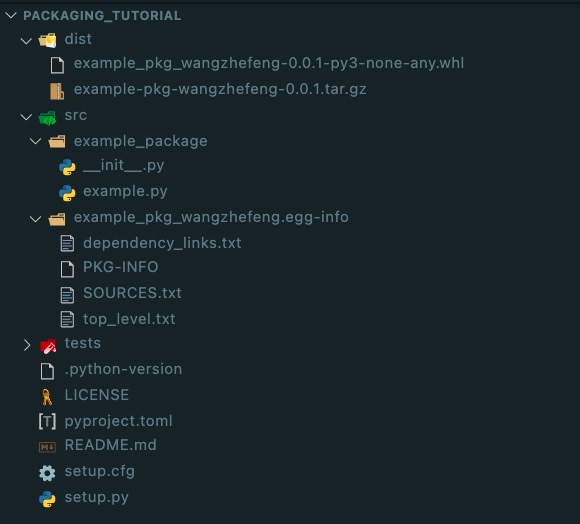
- 最终的project
packaging_tutorial结构如下图
上传分发档案
- 这里为了进行测试,在 TestPyPI 上进行
- TestPyPI 地址:https://test.pypi.org/manage/projects/
在 TestPyPI 上注册账户,并生成一个 API token
将生成的 API token 配置在本地
原理:
$ vim ~/.pypirc

[testpypi]
username = __token__
password = ***

-- INSERT --
上传分发档案
原理:
$ pwd
~/packaging_tutorial

$ python3 -m pip install --upgrade twine
$ python3 -m twine upload --repository testpypi dist/*
安装新上传的 package
- 安装 package
$ python3 -m pip install --index-url https://test.pypi.org/simple/ --no-deps example-pkg-YOUR-USERNAME-HERE
- 测试安装的 package
example_package
$ python3

>>> from example_package import example
>>> example.add_one(2)
3
下一步–PyPI
- 上面的第 4
5 步,都是在 TestPyPI 上为了进行测试完成的, 如果一个包要正式发布在 PyPI 上,需要将第 45 步切换到 PyPI 上进行- PyPI地址: https://pypi.org/manage/projects/
-
重新选择一个好的 package name
-
在 PyPI 上注册账户,并生成一个 API token
-
将生成的 API token 配置在本地
$ vim ~/.pypirc

[pypi]
username = __token__
password = ***

-- INSERT --
- 上传分发档案
$ pwd
~/package_dir

$ python3 -m pip install --upgrade twine
$ python3 -m twine upload dist/*
- 安装 package
python3 -m pip install [your-package]
- 测试 package
$ python3

>>> from your_package import function
>>> ...
最后 Git 和 GitHub
Clone
- 在 GitHub 上新建一个
packaging_tutorial空仓库,并 Clone 到本地
$ cd project_path
$ git clone git@github.com:wangzhefeng/packaging_example.git
- 从第 1 步开始做
- …
在命令行新建一个 GitHub 仓库
- 在 GitHub 上新建一个
packaging_tutorial空仓库 - 将本地 project 进行 Git 初始化,并 Push 到 GitHub 仓库
packaging_tutorial
$ echo "# packaging_example" >> README.md

$ touch .gitignore

$ git init
$ git add .
$ git commit -m "first commit"
$ git branch -M main
$ git remote add origin git@github.com:wangzhefeng/packaging_example.git
$ git push -u origin main
将本地仓库直接推送到一个 GitHub 仓库
- 在 GitHub 上新建一个
packaging_tutorial空仓库 - 将本地 project 直接 Push 到 GitHub 仓库
packaging_tutorial
$ git remote add origin git@github.com:wangzhefeng/packaging_example.git
$ git branch -M main
$ git push -u origin main
从其他仓库导入代码
- 暂时没用过,不知道是啥